
Hybrid Presentations via ZOOM using Media Carts provided in SR25 (with older information for HS2, SR13, SR14)
Room key needed outside the Lecture Period
Check here for the Lecture Period dates. Key available from the Seminarraumbuchung people or in emergency from the Technischer Hausmeister.
The Media Carts require a key to unlock them
but the keyboard drawer in SR25 is usually unlocked. Check with the Seminarraumbuchung people or the Technischer Hausmeister.
People responsible for the technical equipment in the Theoretikum Lecture Halls and Seminar Rooms:
Keys, microphones, media carts operation: person listed as Technischer Hausmeister
Currently (02/2024): Frank Schleweis 06221-56-39234 frank.schleweis at znf.uni-heidelberg.de
Media carts configuration: person listed under Audio/Video
Currently (02/2024): Michael Faske 06221 54-16957 michael.faske at znf.uni-heidelberg.de
SR25 room lighting, sound, projector: person listed under EDV
Currently (02/2024): Lutz Nücker 06221-54-4783 INF328, r.108 Lutz.Nuecker at bzh.uni-heidelberg.de
Seminarraumtechnik page of the Electronics Workshop
The ZOOM meeting is open from 12:00
ZOOM administrator: the IZN meeting must be extended at the end of the year in order to keep the old ZOOM link.
Hybrid presentations using the media cart in SR25 INF 328 (updated January 2024)
1 Equipment
The media cart could be used alone but an additional laptop is used here to administer the ZOOM meeting participants and audio quality, especially of the parabolic microphone.
If using the parabolic microphone for introduction and questions, the administrator's laptop is necessary to monitor the sound.
| !!! | LOGITECH Spotlight Presentation Remote |
| 2x USB sticks labelled 'IZN' containing LOGITECH Presentation Lite software and for presentation transfer | |
| 2x AA batteries (spares for the SHURE wireless microphone) | |
| Printout of announcement and these instructions | |
| Smartphone as a software token to connect to the network with multi-factor authentication |
|
| Optional: Laptop with Firefox and ZOOM (for ZOOM administration) with power supply, 6m extension cable and a floor mat to cover the cable | |
| If the additional parabolic microphone is used: | |
| Laptop with Firefox and ZOOM | |
| Laptop power supply | |
| 5m extension power cable | |
| 3 floor mats | |
| Parabolic microphone - dish with lavalier microphone | |
| !!! | JABRA Evolve 65 Bluetooth headphones |
| RØDE GO II Wireless Microphone set | |
| MONICON audio controller | |
| BELKIN 1-to-5 3.5mm audio adapter (for use with the parabolic microphone in SR25 only) | |
| !!! | 5v battery pack with USB-C connector |
| USB power adapter | |
| !!! | = Equipment to be charged overnight |
The RØDE transmitters and receiver may be checked for settings and updates using RØDE Central (download):
|
|
| Note that the capacities of the batteries in the transmitters are very low. External power is necessary. | |
In the following setup instructions:
- The numbered lines are important steps
- Dots are for information
Setup time ca. 20 minutes.
2 Hardware Setup
Projector, sound and lighting setup
- Lighting controls are near the door
- adjust to medium brightness
- control panel on the desk is broken
-
- test with the wireless microphone from the media cart
- The black audio cable with the green plug labelled 'Audio Medienwagen' should be connected to the 3.5mm audio socket on the desk
If also using the parabolic microphone
- Plug the green 3.5mm audio plug from the desk audio socket into the BELKIN audio adapter
- Plug the BELKIN audio adapter into the desk audio socket
- Connect the MONICON controller input to the BELKIN audio adapter
- use a 3.5mm audio connection cable from the RØDE microphone set
- Connect a RØDE transmitter to the MONICON 3.5mm output
- use a 3.5mm audio connection cable from the RØDE microphone set
-
- use a USB/USB-C cable from the RØDE microphone set
- an LED should come on (might be flashing)
- Switch on the RØDE transmitter
- with a long press on the Ø button
- the second LED should come on ('connected to receiver')
- Set MONICON to -36dB
- balances the sound level of the speaker's microphone to match the parabolic microphone
- check that the MUTE button is not pressed in
- Connect the RØDE receiver to the USB hub and switch the receiver ON
- with a long press on the Ø button
- until the display comes on
- information about the RØDE transmitters will be displayed
3 Preparing the media cart PC
- Press a key and log in
- use your Uni-ID
- if there is no login window (= either the PC is off or the login window is on the projection screen):
- when the monitor power light is OFF or yellow, remove the cart's power plug, wait 20 seconds and plug it back in
- SR25: if the monitor power light is ON and blue, unplug the HDMI cable to force the login window onto the PC monitor
- Connect to the wired network with Cisco Secure Client
- in the task bar or under Programs
- use your Uni-ID
- and your Smartphone to generate the software token
- Cisco Secure Client might update itself and may require a PC restart, in which case repeat steps 1 and 2.
- Connect the LOGITECH Spotlight Presentation Remote receiver to the USB hub under the PC monitor
- Run 'Presentation Lite' on an IZN stick
- must be started from the stick!
- Plug in the HDMI cable from the back of the media cart to the HDMI connection on the desk
- SR25: If the projector has not come on automatically, switch it on with the EPSON remote control (blue button)
- Open ZOOM. Right-click the ZOOM widget and check for updates
Only if the PC monitor is either mirrored on the projection screen or is not the main screen
- Plug the HDMI cable from the cart into the desk connection, if not already
- Wait until the desktop appears on the projection screen
- Right-click the desktop and select Display Layout
- Move the Display Layout window to the PC monitor, if not already
- Under 'Multiple Displays' select 'Extend'
- the layout should be PC monitor on the left, projection screen on the right. Drag to change > 'Apply'.
- set the PC monitor to be the main screen > 'Apply'
ZOOM sharing setup
- Open Firefox
- Open the ZOOM meeting from the IZN home page
- Microphone:
- Speaker's microphone only: Realtek
- with Parabolic microphone: Tischmikrofon (Wireless GO II RX)
- The other ZOOM settings should be:
- Audio > loudspeaker: Lautsprecher (Realtek)
- Audio > loudspeaker volume: should be slightly too loud
- Audio > microphone volume: AUTOMATIC
- Audio > Suppress background noise: AUTOMATIC
- Audio > Advanced > Signal processing by Windows audio device drivers: OFF
- Video > camera: LOGITECH BRIO
- Video > HD OFF
- narrowest view
- Adjust the camera view on top of the monitor
- Video > adjust for low light: AUTOMATIC
- The other ZOOM settings should be:
- Activate Audio and Video
- the buttons show the status: crossed out = currently switched off
- Share the projection screen and sound
- the number to choose is shown on the projection screen
- If there is a green border on the projection screen, go to ZOOM Settings >Share Screen > Advanced: switch off green border
- Adjust the ZOOM videos window
- Click the four-boxes icon for the largest images
- Drag a corner to make the video window quite large
4 Preparing the laptop for ZOOM administration
- Use the right corner at the front of the room
- Connect the laptop power supply to the desk
- using the extension cable covered with the floor mats
- Start the laptop
- Connect to wifi network 'UNI-WEBACCESS'
- browser opens for your Uni-ID login
- Join the ZOOM meeting from the IZN home page
- Take over as Administrator by entering the 'host key' (2****2) in the Participants window menu
- Activate the Waiting Room in the Participants window.
5 If using the parabolic microphone
- Connect a RØDE transmitter to the lavalier microphone cable
- Connect the battery pack
- the battery LED should come on
- Switch on
- with a long press on the Ø button
- the link LED should come on ('connected to receiver')
- On the RØDE receiver, check that transmitter #2 is displayed
- crossed-out microphone = muted
6 Preparing the presentation
- On the IZN USB stick, start the Presentation Lite software
- Press a button on the LOGITECH remote
- It should buzz to confirm communication
- Transfer the speaker's presentation onto the desktop and open it
- Start the presentation
- not in Presenter View
- Presenter View can be deactivated on the presenter monitor or by right-clicking the projection screen
- Minimise the PowerPoint window
- Mouse-click the presentation on the projection screen and leave the mouse arrow in a corner
- this makes the projection screen the active window for the LOGITECH Spotlight Presentation Remote
- do not move the mouse arrow away from the projection screen
- mouse arrow disappears after some seconds
- Chech that the LOGITECH presenter shows a 'laser' dot and changes the slides
7 Preparing the speaker
- Let the speaker use the LOGITECH Spotlight Presentation Remote to try the presentation
- Check videos and/or sound recordings
- Return to the first slide
- use Presenter or PC keyboard arrow keys
- Give the microphone to the speaker
- point out the on/off switch
- check the battery strength when switching on
- spare AA batteries might be in the drawer
8 ZOOM administration and sound monitoring
- Switch on the JABRA Evolve 65 Bluetooth headset and let it connect to the laptop
- should connect automatically: "Connected to mobile" heard in headset
- to pair for the first time, move the headset switch to the Bluetooth symbol (= pairing mode), open the laptop Bluetooth devices control window (or right-click icon in the task bar) and pair the laptop with the Jabra headset
- the Jabra Bluetooth dongle is not used
- should connect automatically: "Connected to mobile" heard in headset
- Set the JABRA headset as the loudspeaker
- Microphone and Video should stay OFF
- Rename the speaker's ZOOM name to 'Speaker'
9 Talk can begin
- in the ZOOM participants list, deactivate the Waiting Room
- 'Admit All' in the Waiting Room
- Watch for any questions, open microphones, active cameras
- If using the parabolic microphone:
- the RØDE transmitter is muted / unmuted by clicking the Ø button – listen on the headphones for the difference
- the RØDE transmitter should be muted during applause (very loud!)
- adjust the speaker/parabolic microphone balance on the MONICON. Away from 0 makes the parabolic microphone stronger but the quality of the speaker's voice will suffer, so a compromise is needed.
Simple laptop setup for hybrid talks with the speaker's microphone only (updated January 2024)
Requirements:
2 laptops needed: one for presentation/ZOOM, one for ZOOM administration.
1 Admin laptop for ZOOM administration
- Go to https://www.izn.uni-heidelberg.de and join the meeting
- Take over as Administrator by entering the 'host key' (2****2) in the participants list menu
- the full code is available from the IZN coordinator
- JABRA wireless headset
- Video and microphone should be off
2a: Using our own laptop for the presentation and ZOOM
- PowerPoint, ZOOM, LOGITECH Presentation Lite software
- USB stick labelled 'IZN' for possible presentation transfer from Windows or MacOS
2b: Using the speaker's laptop for the presentation and ZOOM
- ZOOM software
- USB stick labelled 'IZN'
- contains LOGITECH Presentation Lite software
3 For both laptops
- Power cord
- USB-C dock (with ports for HDMI, USB, USB-C)
- USB/USB-C cable
- BELKIN 1-to-5 3.5mm audio adapter
- RØDE microphone set
4 Laptop setup
- Connect to wifi network
- 'eduroam' if already installed
- 'UNI-WEBACCESS' also available. Browser opens for Uni-ID login
- Connect USB hub
- Connect HDMI to projector
- projector should switch on automatically, otherwise use remote control
- Arrange the monitors to be in the side-by-side mode, not mirrored
- Windows: right-click the desktop and select 'Arrange Monitors' from the pop-up menu
- Mac: System Settings > Displays > Arrange
- Connect external webcam with USB/USB-C cable
- located above media cart monitor
- Plug the green 3.5mm audio plug from the desk audio socket into the BELKIN audio adapter
- Plug the BELKIN audio adapter into the desk audio socket
- Connect the BELKIN audio adapter to a RØDE transmitter
- use a 3.5mm audio connection cable from the RØDE microphone set
- Connect the RØDE transmitter to the USB power adapter
- use a USB/USB-C cable from the RØDE microphone set
- an LED should come on (might be flashing)
- battery is very weak and must have the power supply
- Switch on the RØDE transmitter
- with a long press on the Ø button
- the second LED should come on (might be flashing)
- Connect the RØDE receiver to the USB hub and switch the receiver ON
- with a long press on the Ø button
- use a USB-C cable from the RØDE microphone set
- information about the RØDE transmitter will be displayed
- Go to https://www.izn.uni-heidelberg.de and join the meeting
- Continue from section '3 Preparing the media cart PC >>> ZOOM sharing setup'
2 alternative hardware setup for HS2 (INF306) (updated May 2023)
To HS2 with the trolley
Go underground to 305, take the lift to the ground floor, keep to the left, turn right at the end and proceed to the lower door of HS2.
Projector, sound and lighting setup
- Activate the touch screen
- Set the main Beamer connection to HDMI 1
- Set the room volume to 75%
- Set the room lighting quite low
- the projector is rather weak
- Test the microphone from the media cart (not sure about this instruction! Needs checking)
- if not using the parabolic microphone
Only if also using parabolic microphone
- Take the RØDE pack, MONICON volume controller, USB power adapter and long USB-C cable to the technical area
- above the seating
- Connect the 'Summe' audio output cable on the desk to the MONICON input
- with a 3.5mm audio connection cable
- Connect the MONICON output to a RØDE transmitter #1
- with a 3.5mm audio connection cable
- Connect the RØDE transmitter #1 to the USB power adapter
- use the long USB-C cable
- plug into any socket marked 'Stromkreis'
- the battery LED should come on
- #1 battery is very weak and needs the power supply
- Set the MONICON to -31 dB
- reduces the level of the speaker's microphone. This matches the level of the parabolic microphone, if used
- Switch on the RØDE transmitter
- with a long press on the Ø button
- the link LED should come on ('connected to receiver')
- Test the wireless microphone from the second drawer (not sure about this instruction! Needs checking)
- not from the media cart
- Connect the RØDE receiver to the USB hub and switch the receiver ON
- with a long press on the Ø button
- until the display comes on
- the status of the RØDE transmitters should be illuminated
ZOOM in Seminar Rooms 13 and 14 (updated March 2023)
This section is old and refers to the time when a PC was provided but the mirroring of monitor and projection screen prevented its use for ZOOM. This should have been changed by the Elektronikwerkstatt in the meantime so that hopefully the monitor and projection screen can be used in 'Extended' mode meaning that the monitor and projection screen are separate..
If this is the case, use the PC provided and refer to the instructions for SR25 with these adjustments:
- Wireless microphone (provided by Herr Schleweis/Elektronikwerkstatt – arrange in advance frank.schleweis@znf.uni-heidelberg.de) output is taken from the loudspeaker output on the media cart. Set the MONICON to -26 and connect to RØDE transmitter and USB power adapter.
- BELKIN 5-1 adapter not needed
The only loudspeaker in the room is located next to the PC.
Output to MONICON controller
Input 1 from media cart / wireless microphone
Input 2 no longer used
Original version of the instructions, not using the media cart but using 2 laptops and laying 50 m of cable(!)
Trolley top shelf
- 1 floor mat
- Parabolic microphone
- 2 laptops
- RØDE microphone set
Trolley bottom shelf:
- 2 floor mats
- 10 m network cable
- 10 m HDMI cable
- 2x 10 m audio extension cable
- 2x 5 m USB extension
Box of accessories:
- FOSCAM webcam
- LOGITECH Presenter
- Power strip
- USB hub
- USB power
- Long USB–USB-C cable
- USB-C battery
- USB/-C stick
- mouse
- Tape
- Wireless headphones
- XLR–3,5 mm adapter cable
- MONICON volume controller
The administrator sits with both laptops at a side table. The main laptop is for the presentation and ZOOM sharing of the screen, camera and sound. The other laptop is for ZOOM administration and sound monitoring – no video or audio sharing.
The speaker will stand on the side away from the window, near the administrator.
Lay the cables along the wall under the blackboard.
The main laptop is connected to the projector with the 10 m HDMI cable. Sound goes from the headphone socket, over the audio cable, 3,5 mm/XLR adapter to Input 2 of the loudspeaker.
The speaker wears a wireless microphone. The sound comes out of the loudspeaker and the Output socket.
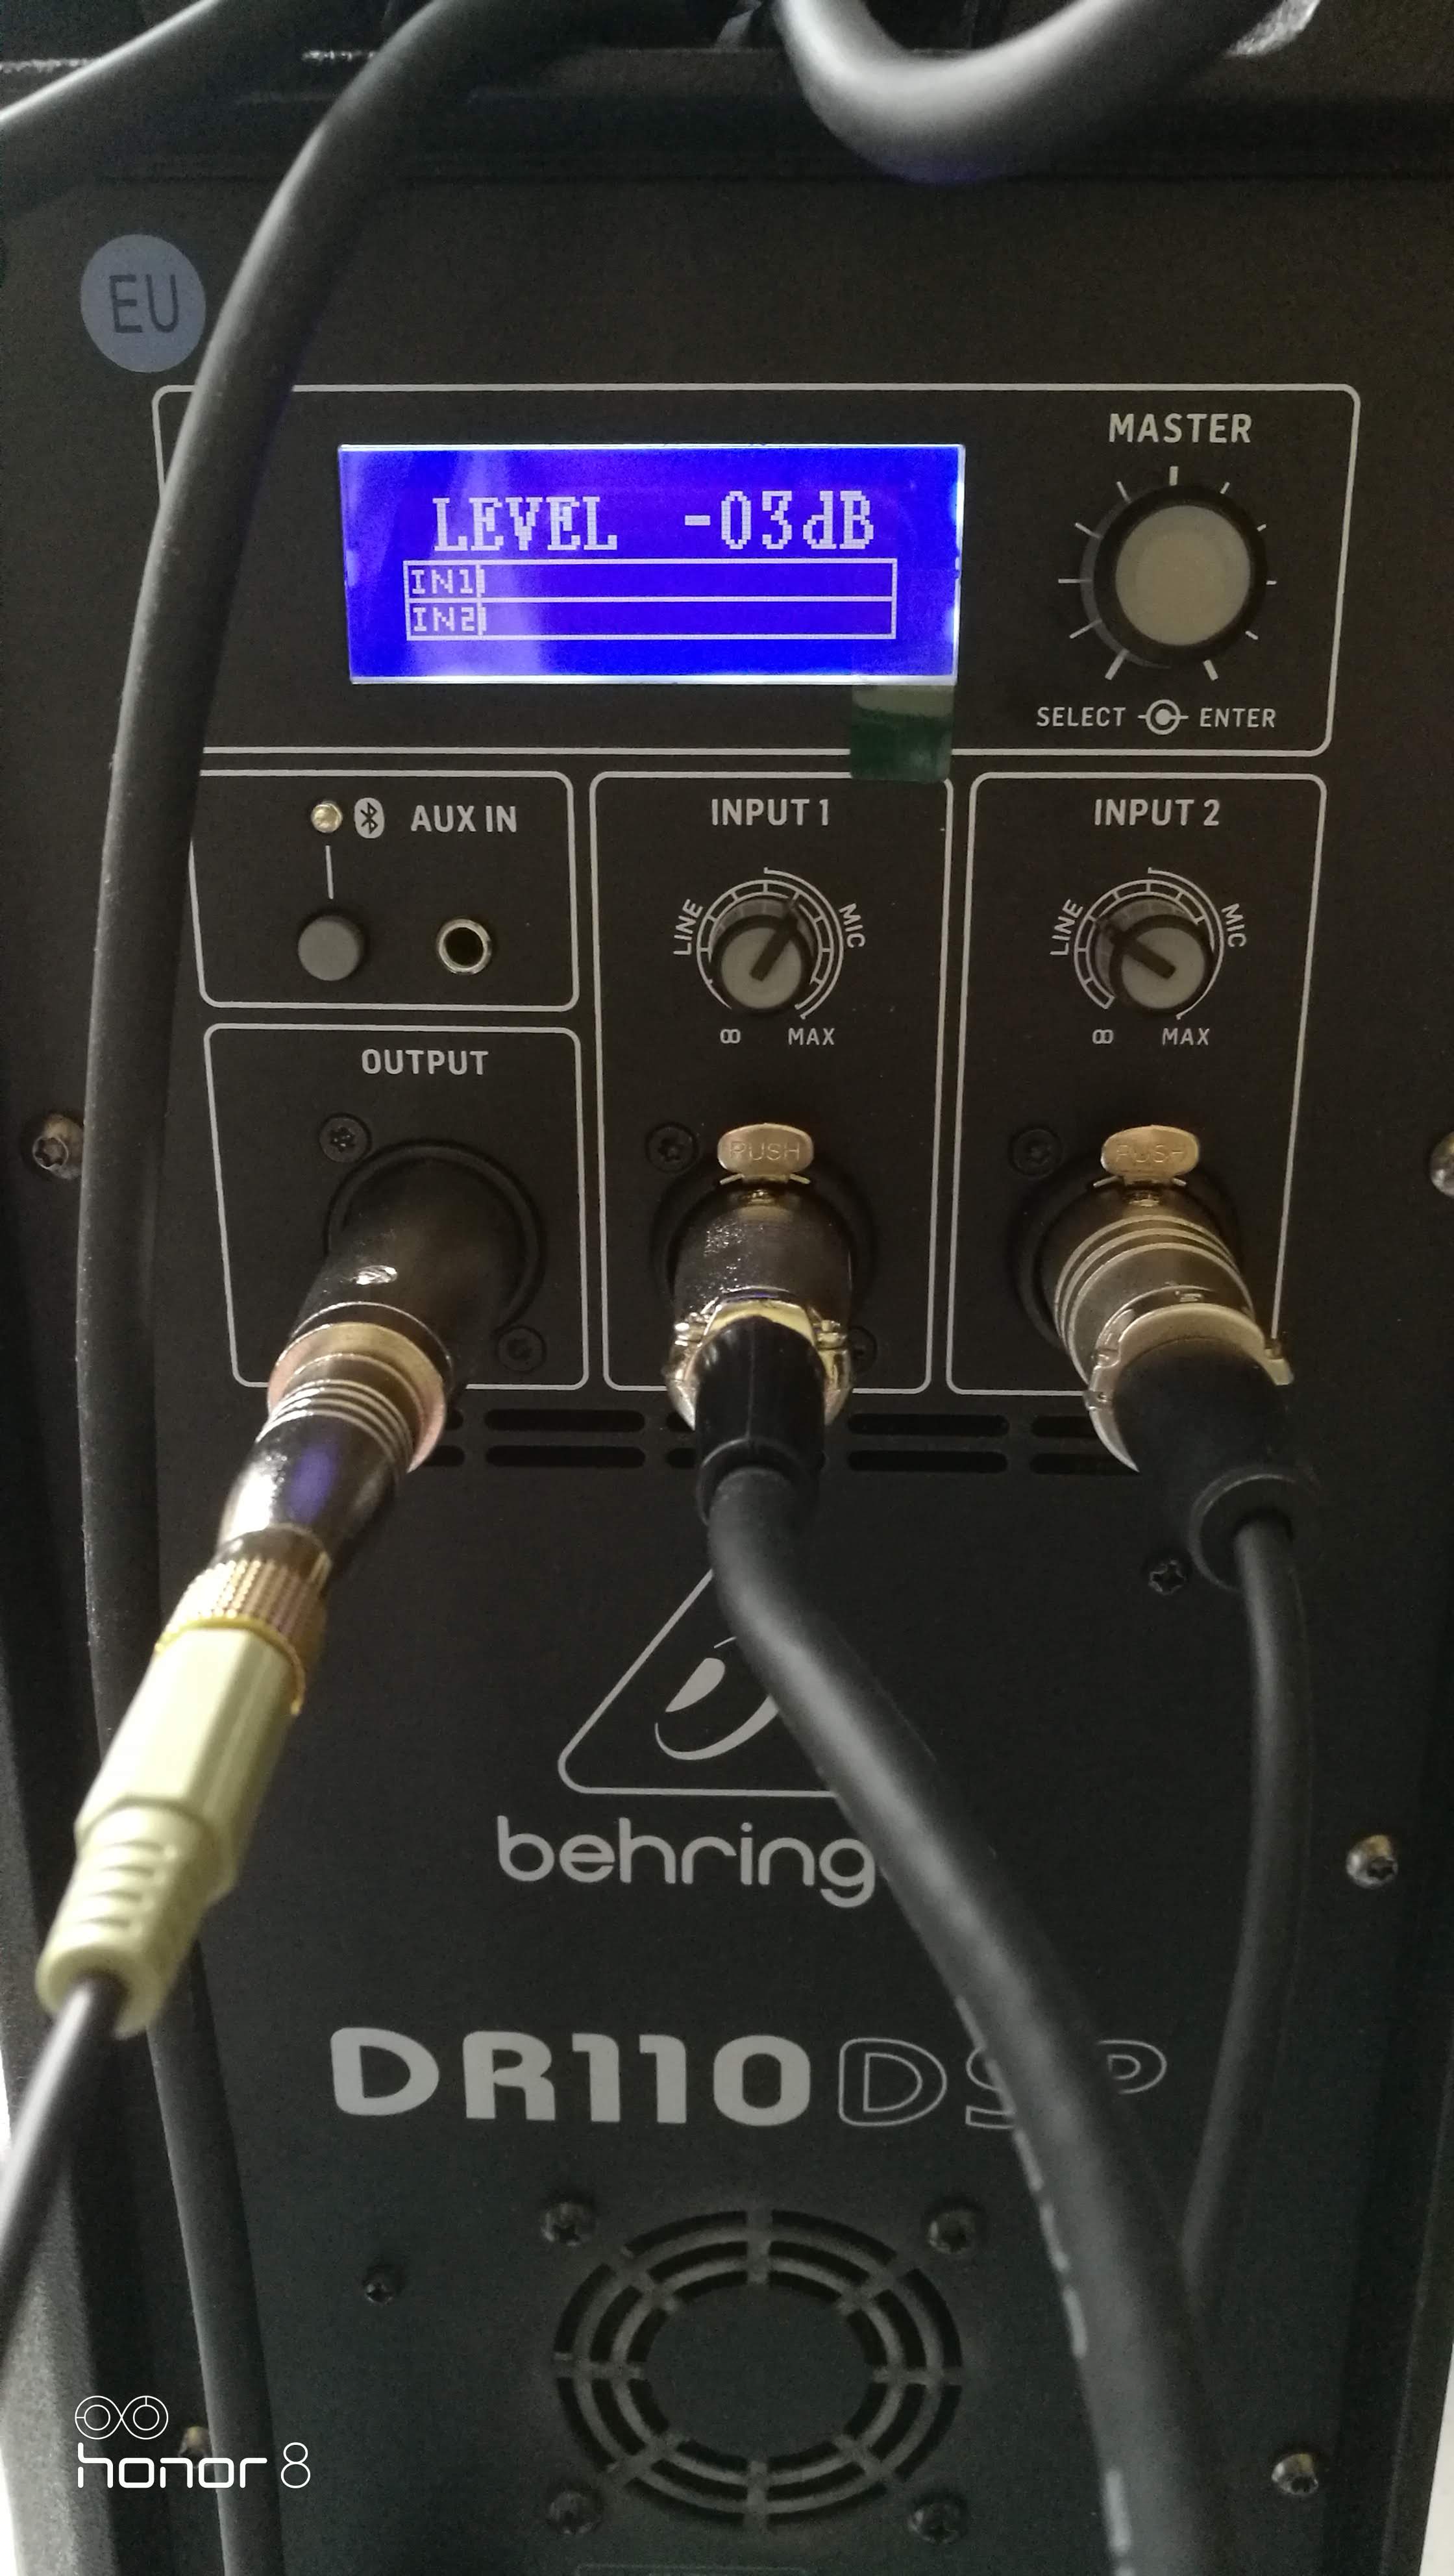
Back of the BehringerDR110DS2 speaker, 14.09.2022:
Output to MONICON controller
Input 1 from media cart / wireless microphone
Input 2 from laptop (ZOOM). Set to 12 o'clock or lower if it buzzes.
Remove the plug from the SENNHEISER microphone
The FOSCAM webcam is mounted and taped near the centre of the blackboard. Connect to the main laptop with 2x 5 m USB extensions. Use the admin laptop to adjust the camera to show the speaker and audience.
Use the FOSCAM webcam as 'USB HD camera'.
Push the 6.35–3.5 mm adapter into the XLR plug. Put the XLR plug into the output of the speaker. Plug in the long audio cable and connect to the input of the MONICON volume controller. Connect the MONICON output with a short audio cable to the RØDE transmitter. Connect the RØDE transmitter to the power adapter and switch on with a long press on the Ø button.
The MONICON regulates the volume from the speaker's microphone to match the volume from the parabolic microphone which is weak and non-adjustable. Start with the MONICON set to -26. After the introduction using the parabolic microphone, use the MONICON to adjust the level of the speaker's voice to a similar level of the introduction.
Place the parabolic microphone on a floor mat on the trolley between the front tables at the wall. Connect to the battery with the long USB-C cable. The microphone will be held by hand.
Use the MUTE function on the RØDE receiver ![]() to switch it on and off for the introduction and the questions. It should be OFF during the applause which is very loud.
to switch it on and off for the introduction and the questions. It should be OFF during the applause which is very loud.
Share the projection screen
Move the ZOOM video or chat window onto the screen if necessary. These windows won't be seen by the ZOOM participants.
When moving the windows back to the laptop, make one last click on the presentation to make it active for the LOGITECH Presenter.
To end the presentation, press ESC.
To find the optimal MONICON volume controller level in HS2
- Point parabolic microphone at technical area
- Set room loudspeakers to MUTE on touch panel
- Clip speaker's microphone to your clothing, as the speaker would
- Take RØDE receiver to technical area
- Speaker's microphone and parabolic microphones should be on and on the RØDE receiver should be seen to be unmuted (no crossed-out microphone symbol).
- Position yourself to look straight into parabolic microphone
- Speak and adjust MONICON until signal strengths from speaker's and parabolic microphones are the same.
- Turn the MONICON 5dB higher e.g. balanced level is at -36dB, adjust to 31dB (as the questioners will shout)
- Reconnect receiver to speaker's laptop.
- Unmute the loudspeakers on touch panel